So you 'wanna' be in a show? Awesome! They are lots of fun but maybe a tiny bit intimidating if you have never done one before. Believe me, I was for the first year or so of doing them--that's for sure! Of course, I tend to get over anxious when doing things for the first time. Now, I often am asked for advice about doing shows with questions ranging from set up to marketing the event and more. So, today I thought I'd share with you a few things I've learned along the way....with the disclaimer that I'm still learning and even when I think I have it down, something happens that changes the game plan once more.
That's lesson one.
1. Prepare for the unexpected and be ready to make adjustments to your set up and display not just during the show, but from show to show.
To expand on that, the biggie is weather if you are doing an outdoor show. You need walls for your tent! Plastic to protect your work, maybe a step ladder to push the water that may pool up on the roof of your tent, tie straps to buckle down stuff like signs or displays.
But in addition to that, every show is different so while you think you may know the lay of the land, be ready with a couple of contingent display layouts because once you get to a location, sun, shade, neighbors, your location, or even the size of your display are may change. I've done shows where I've had a 10x12 area, to a small 6ft table with room for a chair behind me, and everything in between.
2. Assortment of work.
It may be tempting to do a few of these and few of that, but think of your display area as being a mini boutique. You want to show a nice assortment of items but have them related in some way so that your 'shop' exudes a voice and signature style that is recognizable. As you group your work together, it could be by type of item you are showing(color or theme for example), have enough of each assortment so it can show as a collection. Sometimes I write out what I want to show and how many, and then work with that goal in mind when preparing for the show. There is a fine line between having too much and not having enough. Sometimes less is more when you set up your display, but at the same time be thinking about what you'd like to make at the show. If you'd like to gross 2000 dollars; you should go in with at least double that amount, maybe even triple that amount of inventory. You won't get to your goal otherwise even in the best of circumstances because it won't be possible if it's not there.

3. Set your expectations high but go into the show with the knowledge that a successful show isn't always shown by the immediate financial gain.
During my first show, I had no idea what to expect but I remember totally overestimating how many of each item would sell and I about killed myself to produce that much work. For example, I thought surely I can sell 100 magnets at 6.00 each, I mean there's going to be 1000's of people there. The way I do my magnets may look simple but they are not really...what they are, is TIME consuming. I think I sold 4 or 6 of them the first show. LOL.

In fact, I totally overestimated how much I'd sell as a whole. I wasn't really upset, I was ecstatic that I had accomplished something I had once only been a part of on the buying end and so happy I sold anything. I was packing up my booth at the end of that day and low and behold a customer rushed over to my booth and was looking through some of my work and ended up buying a bunch of pieces at the very last minute. I mean last minute in terms of others already had their booth down and truck was toting their goods off. It's not over till it's over and even then it's still not over.
4. Look at art festivals as a great way to market yourself to people that may never have known about you or your work.
If you do this, then every show will be a success. Of course, marketing cost money so while you may not be able to afford 12 big marketing events every year, select 3-5 shows to begin with that fit your style or would be a good market to get into and go into the festival with a positive attitude and the knowledge that you NEVER know who may walk into your booth and offer you an opportunity that you had never imagined. I've had countless experiences where customers came in to my booth and came back to me down the road and either bought my work online, took a class from me (all over the country), ordered custom pieces from me, asked me to be in THEIR gallery, or purchased something at a gallery that I was already in. Speaking of a positive attitude, be very careful about what you say to customers, other people within ear shot or other artists about the show. No one likes a Sulky Suzy or a Whiney Wendy and it doesn't reflect well on you as a business person. When things aren't going as well as you expected, smile, be friendly, rearrange your booth, or work on demonstrations to keep yourself occupied.

5. Promotional Material
It goes without saying that you should come stocked with business cards, post cards and even small items you might consider as loss leaders to give out. Pass them out to every customer that walks in your booth and encourage them to check out your work online or email/call you if you can do something for them in the future. Keep a mailing list. If you are really organized, perhaps notate the segment of names gathered from that show and email that group next year when the show comes around to remind them that you will be back.I can guarantee you they will stop back in to see you if they come to the show.
Hopefully the organizers of the show have a facebook page, website, or newsletter of their own to promote the event, and if they do, make sure you engage with the page to help get the word out. After all, the more people that know about YOU, the show and the work that will be there from all of the artists, the more likely it will be a successful event. Social media is a great way to get the word out, so definitely familiarize yourself with it if you aren't already and use it to your advantage!
6. Pricing
Ahhhh pricing. It is the conundrum for every artist, especially in the beginning when you are first getting started. There are a lot of costs involved in doing a show that may not be easily seen from the naked eye. It's easy to assume that 100% of what you make at a show goes directly to you. And for the most part it does. Kind of. But don't forget the cost of doing business which includes but not limited to: show fees, display merchandising expenses, business cards, 'cash register' material( like sales slips, staples, pens), packaging (bubble wrap, tissue, bags, and any other add on like branding stickers or ribbon you add to the bags), hotel cost, travel expenses such as gas to get to the event and tolls, food expenses while there, taxes, signage, not to mention the cost of YOU doing the work to begin with (your time and supply cost), along with other things such as cost for a baby sitter for the weekend if you have kids, pet siting...a whole mryiad of things. So yes, it may seem like an artist gets 100% of what is made but by the time you factor in all the costs, it's more like you net 40-50% at best.
Which brings me to the point of pricing your work accordingly. This is really important whether or not you are doing shows, selling online or selling wholesale. There really isn't a magic formula but the thing to keep in mind is to be consistent in your pricing. You don't want to sell the same type of item in 4 different locations (say online, at shows, in galleries, or catalogs) and have the prices all over the board. Customers won't like it and neither will your partner shops or boutiques if you under cut them when you do shows or sell for yourself online.
7. Show stoppers
I like to bring at least 3 or 4 pieces that I consider show stoppers or statement pieces with me to each festival. They may not be the pieces that sell, but they are what draws a customer in. If you sell smaller items, it could be how you display the item(s) that are what you consider show stoppers that draw people in. The trick is not to frighten people off and I'm still debating if I'm doing it right...and by that I mean, it could work to your disadvantage if you lead with your highest priced item right out front because customer could peak in and say, no I won't be able to afford anything in this booth. Or it could taint them and leaving them wanting nothing other than that big piece, OR it could encourage the customers to come in and look at what they might be able to get even though they couldn't purchase the 'gateway' piece right then and there. You have to feel it out based on the show on which scenario it may be for each show and go with your gut. But bring some of your best pieces and with any luck, it not only will draw customer in, it will enhance their shopping experience.
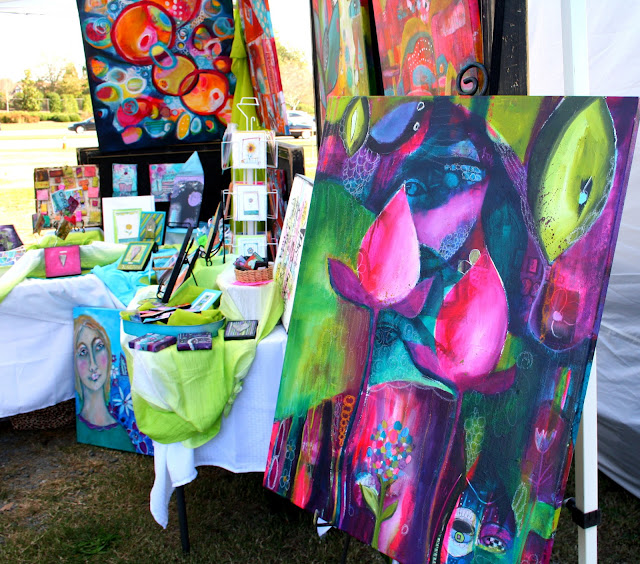
8. Have someone help you at your festival.
It's not always possible to bring someone but if you are lucky to have a friend or family member that doesn't mind hanging out and helping you (at least get set up), by all means bring them along. The perfect person to travel with will help you set up, be available for bathroom breaks or if it gets busy, but doens't mind wandering around and doing their own thing so you can focus on customers the rest of the show, then come back and help you break down when it's all over with.
There are some shows that have booth sitters that are very helpful to call on if you do need a break or if not, make friends with your neighbor and watch each others space when either of you needs to step away.
Every so often, there are shows that have lots of volunteers to help set up and break down, but those are the exception rather than the norm. If in doubt, call the organizers and double check. If you need extra help they may be able to either get a volunteer to aid you or find someone for a small fee to do it locally.
THANK THE VOLUNTEERS! BTW. Sounds obvious but so many people come to expect things rather than be grateful for what others do for you or the community. Thank them for their efforts.
9. Make a List
Check it twice. I'm a list maker so I had to add that in. It's the only way I can remember everything! After doing a couple of shows I started organizing things differently, such as keeping a box that had all of my 'register items" in it permanently, a tote for all of my linens, another for my props and signs. Keeping those aside makes packing and set up easier.
Bring snacks, drinks, something to write on (take notes during a show, you never know when you may get a special order request or someone may say something that may inspire you for future designs).
Back to the list. Save your sanity and pack up things a day or so before heading out to the show. Easing into the day without having been up all night doing that one last thing is really the ideal situation.
10. Get to the show early
Going back to number 9, things always take longer than you expect, especially if you are doing a show for the first time. Even as far as parking for the vendors being way far away and having to take a shuttle back from your car after initial set up. That in itself can take 1/2 hour to 45 minutes...if you aren't prepared with a little bit of cushion in your set up time it could serve as a rocky start to the event.
Setting up with ample amount of time allows for a smooth start even if you are a bit nervous to begin with.
11. Have fun.
You are doing what you love to do after all. Yes it is a lot of work, probably more work than anyone ever realizes, but how cool it is to have people admire your work and even better, purchase something that YOU made with your own two hands. Pretty freekin cool.
Take time to investigate the area that you are doing the show in, check out a local favorite restaurant while there, maybe some music, or other attraction if time allows. Yes you will be tired...but it's worth it. I promise.
12. When You Think You Know What to Do, It's Bound to Change.
I could go on and on about what to bring, what not to bring, what to sell or not to sell but the truth of the matter is that it's different for everyone and it is constantly changing with every show and every year. The biggest seller in a show may have a flop the next year. Or the show that was just a fun thing to do one year ends up being the best show ever for you. Perhaps the THING you are SURE everyone is going to buy ends up being the slowest item and the surprise item you just came up with ends up being the hit.
You don't know until you get there so the bottom line is be flexible, do your best work no matter what, make your booth attractive and cohesive, smile, have fun, and be open to the fact that every customer that walks into your booth is important and should be treated that way. Lastly, it's not over till it's over. I'll say that again because very often, the last customer ends up being your best customer. It's happened time and time again. Be ready for it. Be ready for anything as a matter of fact:)
***Please feel free to share this post and add your own show tips if you like!***
Jodi
*******************


 Pencil: This pencil has a an ultra smooth feel to it, with a crisp line that is strong yet soft, you will definitely feel the difference between a Tombow and other pencils. I received my first one during Art Journal Live as a swag bag giftie and loved it so much, I bought a whole set! *I guess that's why manufacturers are happy to add swag bag goodies for big events, folks like us can't help ourselves but to buy more!! lol

 : Oh my, if you like to do quick sketches and want shading, grab this pencil! Ultra black and 'smudgeable' when dry, it's also water soluble when wet. Add some gesso over the black lines and you get...wait for it....GRAY..LOL.

 family of pencils is the ever versatile graphite Stabilo: Again, create a beautiful gray scale with this pencil dry or wet, you'll find shading a breeze when incorporating this useful tool in your drawing arsenal. Soft graphite that is water soluble, a Stabilo pencil is a must have for mixed media and sketching artists of all types.

 l. It notes on the description that it is a charcoal pencil but I honestly did not realize that until someone pointed it out to me when I recommended it for a class. It acts more like a cross between a china marker (those black pencils with the oil like black led with the paper you unwrap) and a a Stabilo pencil. It writes soooooo well over acrylics which is why I really love it. It too, can be smudged but it's not AS water soluble as the Stabilo pencil. So, if you want your lines to stay in place but yet have a bit of dark shadows and bold marks, this is the pencil for you. I use it more for accents and drawing over acrylics, but the uses are endless for this wonder tool!

 is awesome. 3 sizes of sharperners with a convenient flip top container which holds your shavings, this tool is fantastic. If you order the Jerry's pencil, you need a special larger size sharpening tool so that is another reason why I recommend this particular style.


.jpg)


