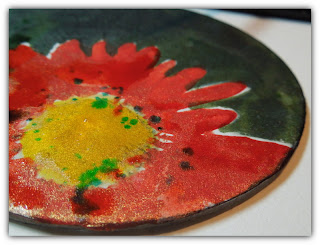
I thought I'd share with you one of the fun projects I used for a class
held in New Jersey at the Create Retreat which used
the yummy creamy shimmering Twinkling H20s (which are available or soon to be available at Hobby Lobby). The romance collection is featured here today and is a perfect set of colors for the fall with warm tones and jewel colors....makes me want to grab some pumpkin pie and play in the leaves. Well maybe not quite yet. Here in the south it is still hovering around 100 degrees almost daily!
Okay so if you haven't played with twinkling h2os, they are little pots of delicious vibrant watercolor cakes which " incorporates a
proprietary blend of mica and other minerals that transmit refractive
light and color, similar to light rays in a crystal"
To use the twinks, simply spritz with water and let sit for 10 minutes or so. Doing so, you will get a nice thick and juicy blend of color which is super vibrant. Conversely if you just wanted a little bit of color then you can just take a wet brush and stir the pot so to speak and pick up the pigment in a less concentrated form.
Pictured are some supplies you can use for this project. The paper coaster can usually be found in your party supply section of your favorite craft store.
You will also need a black an white photo that you can cut to the size of the coaster.
Start by sanding your coaster just a bit until it is no longer shiny. I probably should have sanded the unprinted side but it didn't really hurt anything with my project however if you have a lighter color photo the printed side of your coaster may show through.
Place your coaster on your photocopy print (I used an ink jet print that was set using workable fixative, printed on 24lb paper) and trace where ever you see fit. Since I did several magnets and wanted them all a bit different, I tried to vary how I cropped and traced the photo.
Cut around your traced outline and adhere to your coaster with a bit of matte medium. Ensure there are no air bubbles by using a brayer or some other tool that you can roll over the paper working from the center out to the edges.
If the cut paper is a little 'wonky' around the edges, you can sand the paper once it dries. Allowing it to dry before you sand lessens the risk of tearing the paper when it is slightly damp from the matte medium.
Once your collaged coaster is dry, it's time to get out your paints. Choosing the colors of your choice, you essentially paint over your print. I used palette paper to blend the colors slightly and to dab excess off of my brush.
Some colors are much darker then others so you may or may not see a portion of the photo peeking through once dried. I tried several color combinations and really loved them all!
Continue to paint your picture over with the twinks. Depending on how much detail, use a brush that fits the scope of your project. I used a small flat and a small round brush.
Once painted and dried, you can take your favorite rubber stamp pad and rub along the edges to get a nice finish.
As I was painting this sample I was also painting a couple other pieces and I accidentally dribbled some paint on the flower....I decided I liked the look and did paint splatters on all of the pieces.
Yay for happy accidents!
Once the project is completely dried, finish off your little 'fridge art' by highlighting and outlining areas of your print to add detail and dimension. I decide to also add a little border to each of the pieces.
Another fun detail to add is an inspirational word of your choice. I used one of my favorite fonts and typed up a bunch of words that meant something to me, then cut up and adhered to various places on the front of each of the pieces.
To add some pop to the words, shade with some charcoal or outline with a pen, marker, or gel pen.
Play with color combinations to make each of your pieces look unique even though you might be using the same photo.
I also sealed mine with some spray varnish just in case any water got on them, they will not bleed.
I hope you are inspired to get out there and create....pick up a set of twinks at your local store today!
**Stay tuned, I will be doing a couple of online classes featuring twinks and silk acrylic glazes also by luminarte coming in September!
Till we meet again, Live to Create, Create to Live
Jodi Ohl
***
Stop by my Etsy shop to see what's new this week!
****
Upcoming local classes
Jerry's Artarama Raleigh, "Who Are You" full day workshop, August 12
Swank Coffee Shop in Southern Pines
"Funky Fresh Fish" 3 hour class August 25
****
Sign up for the next three days and save!
I'll be teaching three classes at both events...whooohooo!
Art Is You...is a one of a kind retreat that you won't want to miss~
Here's a peak at some of the sample projects for both retreats:


1 comment :
Hi Jodi - how are you - I've been using the twinkling H20s and love love love them - thanks for bringing them to our attention!
Post a Comment